


Guessing is the wrong first move when a metal watch bracelet feels too loose or tight. Before reaching for a tool, identify how its links are secured. If you’re learning how to adjust a metal watch bracelet, distinguishing push pins, screws and pin-and-collar links helps prevent scratches and misplaced parts.
Take care: small components are easy to lose, and forcing a pin, screw or clasp can cause damage. The right adjustment depends on the bracelet’s construction, so inspect it before you begin.
This guide explains how to identify the link system, choose suitable tools and remove links carefully. You’ll also learn how to balance the adjustment around the clasp, check the fit and recognise when to stop. Make one small change at a time, then test the bracelet before removing anything further.
How to Adjust a Metal Watch Bracelet: Start by Identifying Its Construction
Bracelet adjustment means changing a watch bracelet’s length or clasp position to improve its fit. The correct method depends on how the bracelet is made. Identify its construction before choosing a tool: a technique for screw-fastened links can damage a pin-secured one.
Take the bracelet off your wrist and place the watch on a soft, clear surface. Inspect the links, their undersides and the clasp. This overview of watch bracelet construction can help you distinguish linked and mesh designs, but examine your own bracelet before acting.
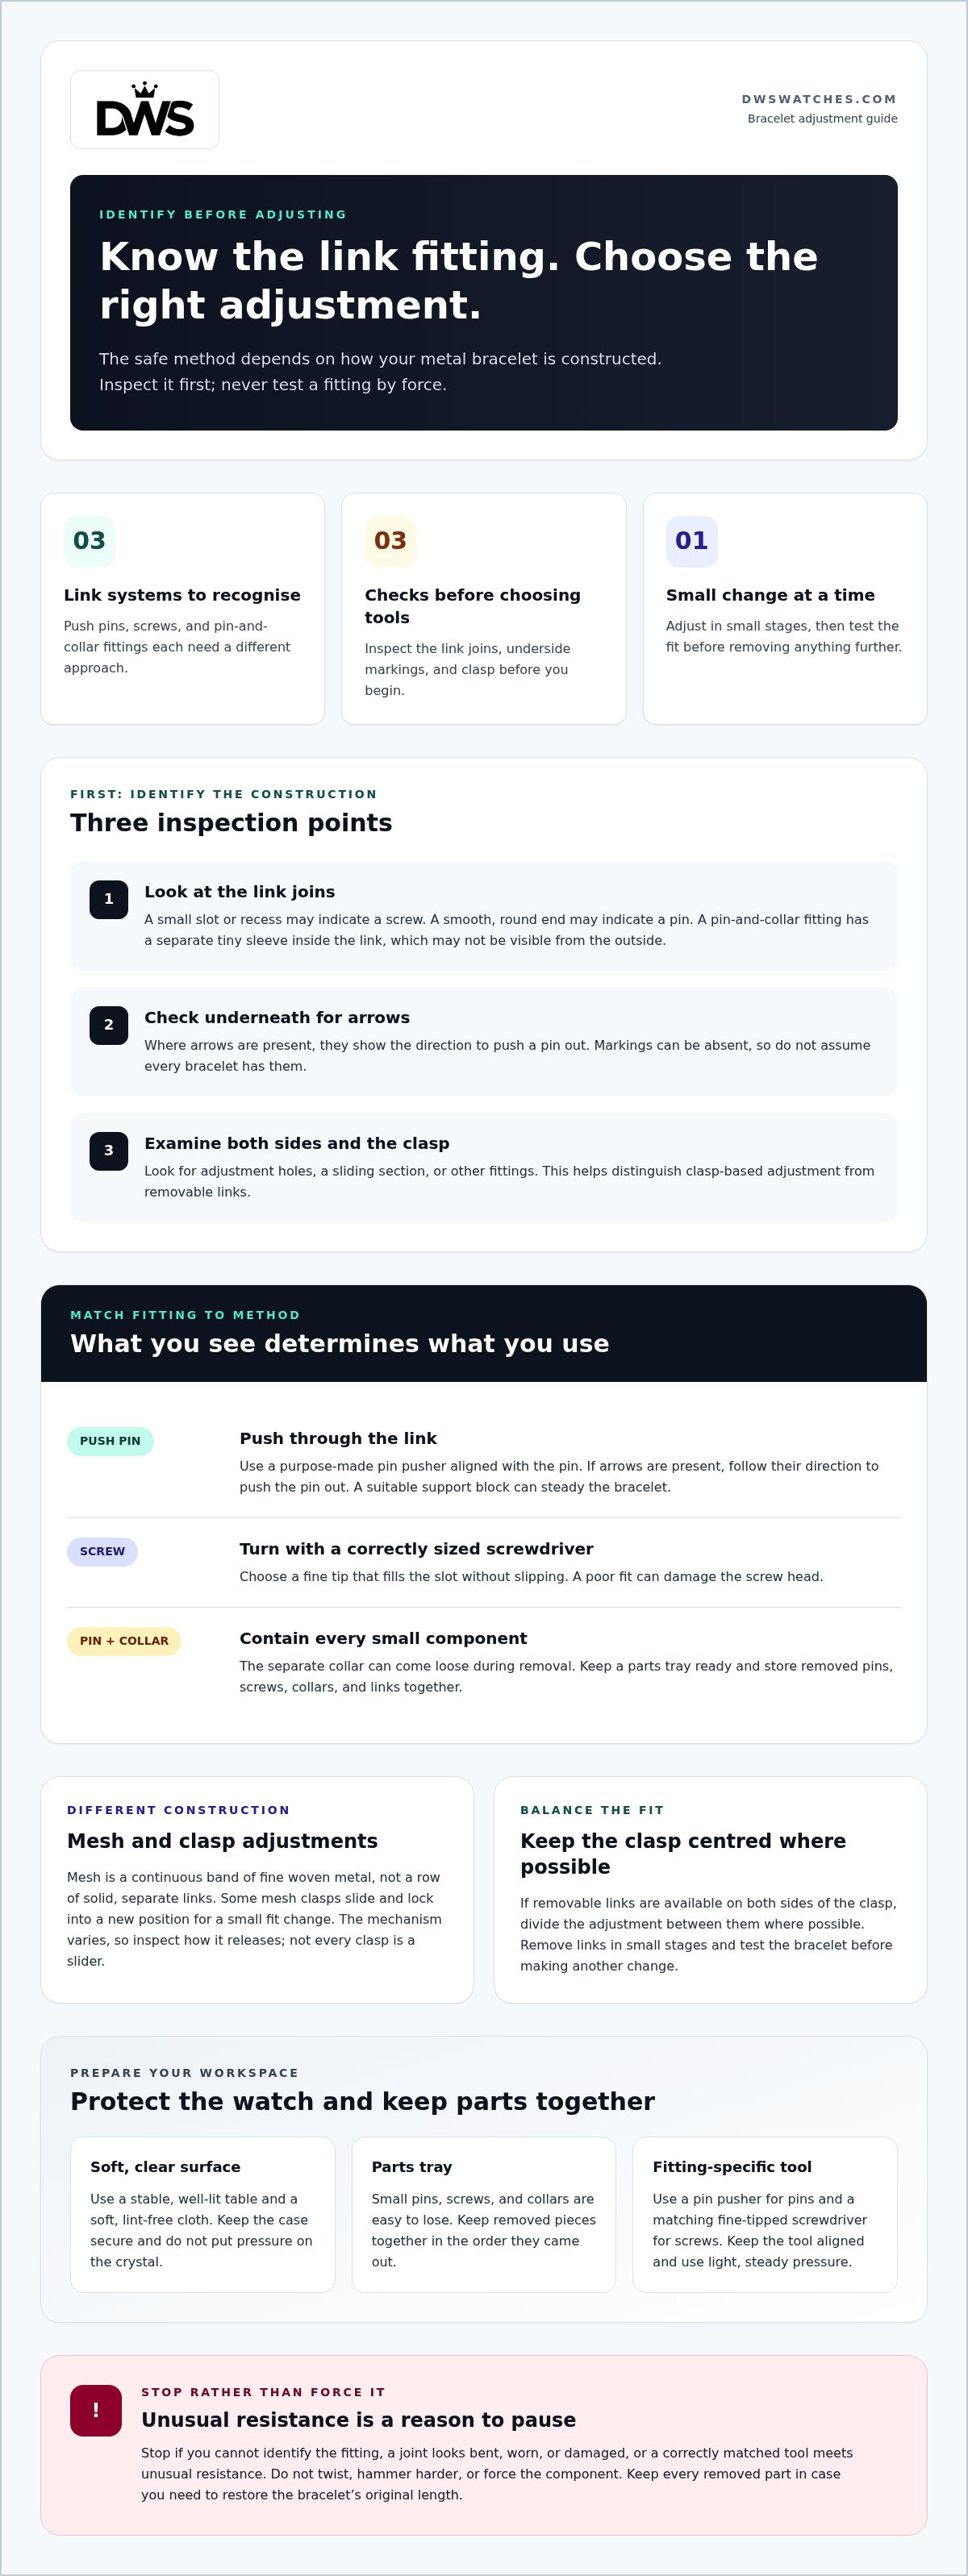
- Inspect the link joins. Look at the outer faces and edges of several links. A small slot at the end of a link may indicate a screw. A smooth, round end may indicate a pin, though its appearance varies. Some systems use a pin with a separate collar inside the link, which may not be visible from the outside.
- Check the underside. Look for arrows stamped into the links. Where present, arrows show the direction to push a pin out, not necessarily the direction to refit it. Markings can be absent, so don’t assume every bracelet has them.
- Examine both sides and the clasp. Turn the bracelet over and inspect the opposite edge, then open the clasp and look for adjustment holes, a sliding section or other fittings. This helps you distinguish removable links from clasp-based adjustment before selecting a pin pusher or screwdriver.
How to tell whether links use pins, screws or another fitting
Screws usually have a visible slot or recess at the end of a link and need a correctly sized, fine-tipped screwdriver. Pins are pushed through the link and may not have a visible screw head; arrows, when present, indicate the exit direction. A pin-and-collar fitting includes a tiny separate sleeve inside the link, so parts can come loose during removal. If you can’t identify the fitting, stop rather than testing it with force.
Recognising mesh bracelets and clasp-based adjustments
Mesh is a continuous band of fine woven metal, rather than a row of solid, separate links. Some mesh clasps slide along the band and lock into a new position, allowing a small fit change without removing links. The locking mechanism varies by design, so inspect how the clasp releases before moving it. Don’t treat every clasp as a slider.
A folding clasp is another feature to identify, but it doesn’t reveal how the links are secured. For example, the Michael Kors Ladies Watch Darci Petite 26 mm Gold is specified with a 14 mm gold-PVD-plated stainless-steel bracelet and a push-button folding clasp. That describes its bracelet material and clasp type, not its link-removal method. To adjust a metal watch bracelet safely, use the visible link fittings and clasp mechanism together to decide what to do next.
Tools and Preparation for Adjusting a Metal Watch Bracelet
Prepare your work area before handling the bracelet. A clear surface, suitable tool and place for small parts reduce the risk of scratches or lost components. The tool should fit the fastening precisely. If you’re unsure which fitting you’re looking at, pause instead of testing it with force.
Set up a safe work surface
Choose a stable, well-lit table where you can see the bracelet joints clearly. Lay down a soft, lint-free cloth to protect the watch and stop parts rolling away. If you place the watch face-down, make sure the case rests securely on the cloth and the crystal bears no pressure. Keep drinks, clutter and loose items away from the work area.
Set out a parts tray or small container before you begin. Pins, screws and collars are easy to overlook, particularly if one drops onto the floor. Keep removed pieces together in the order they came out. Avoid gripping polished links with hard or abrasive tools, which can leave marks even when the adjustment itself is straightforward.
Choose tools for the fitting
Match each tool to the visible fastening rather than reaching for a general-purpose implement. A purpose-made link pin pusher presses pins through links. A correctly sized, fine-tipped screwdriver is for screw-fastened links. A bracelet support block can hold a linked section steady and help keep the tool aligned.
- For pins: use a pin pusher that meets the pin squarely. A small watchmaking hammer may be used with a suitable support block, but keep taps controlled.
- For screws: choose a screwdriver tip that fills the slot without slipping. A poor fit can damage the screw head.
- For small parts: use a parts tray to contain pins, screws and any collars released from a link.
Don’t substitute a kitchen knife, large screwdriver or improvised punch. These can slip, scratch the bracelet or bend a small component. Keep the tool perpendicular to the fitting and use light, steady pressure. More force won’t solve a poor tool fit.
Make a final check before starting
Before adjusting the bracelet, inspect the joint again under good light. Compare the tool tip with the pin or screw, and check the underside for arrows or other direction markings. Arrows, when present, show the direction to push a pin out. Don’t assume an unmarked link follows the same direction.
Stop if a joint looks bent, worn or damaged, if the fitting remains difficult to identify, or if a correctly matched tool meets unusual resistance. Don’t twist, hammer harder or force the component. Set the watch aside and consider the designer watch selection while you decide on your next step.
How to Shorten a Metal Watch Bracelet by Removing Links
Remove links in small stages. Taking out too many at once can leave the bracelet unbalanced or too short. Keep every link, pin, screw and collar in case you need to restore the original length. If removable links are available on both sides of the clasp, divide the adjustment between them where possible to help keep the clasp centred.
Use the method that matches the fitting you identified. The steps below cover push-pin and screw-secured links. If the joint has a different construction, don’t apply either method by guesswork.
Removing a link secured with a push pin
- Choose the link. Select a removable link, usually near the clasp, and check the underside for an arrow. Where present, it indicates the direction to push the pin out. Support the bracelet so the link stays level and steady.
- Align the tool. Place the pin pusher against the pin end, in line with the marked direction. Keep the tip centred. A tool that slips off-axis can scratch the link or bend the pin.
- Push the pin through. Apply steady, controlled pressure. If the pin doesn’t begin to move, stop and check the alignment and direction. Don’t strike harder or force the tool. Catch the pin as it emerges and place it in your parts tray.
- Separate the link and retain its parts. Remove the selected link, watching for a small collar that may sit inside the joint. Keep the collar with the pin and link. Remove only the number of links needed, then reassess the fit before continuing.
- Reconnect the bracelet. Join the remaining ends with the original components, keeping the link orientation consistent. If an arrow is marked, insert the pin from the opposite direction. Press it fully into place, then check that it sits flush and the joint moves freely.
Removing a link secured with a screw
- Fit the screwdriver. Choose a fine-tipped screwdriver that fills the screw slot closely. Hold the bracelet securely on its support. A loose-fitting tip can slip across the metal or damage the screw head.
- Loosen the screw carefully. Turn it steadily and keep the screwdriver aligned with the slot. If it resists or the tip slips, stop. Don’t increase force or use a blade that doesn’t fit.
- Remove the link and store the parts. Lift out the screw and separate the chosen link. Keep the screw and removed link together in the tray. Make one small adjustment, then reconnect the bracelet.
- Secure and inspect the joint. Refit the screw in its original position and tighten it carefully until secure. Don’t overtighten. Check that the screw sits correctly and the links articulate without a gap or looseness.
For either method, work on one link at a time and preserve the original parts. If the fitting is unclear, damaged or unusually resistant, stop rather than risk bending a pin or stripping a screw.
Fine-Tune the Fit with Clasp Adjustments and a Careful Fit Check
A clasp adjustment can make a smaller change than removing a full link. Check the clasp before taking more links out, especially if the bracelet feels only slightly loose or tight. Adjustment features vary. Some clasps have several small positions for the bracelet end; others are fixed and offer no fine adjustment. Don’t assume every metal bracelet uses the same mechanism.
When a clasp adjustment may be enough
Small holes or slots inside a clasp can let you move its attachment point between positions. This may refine the fit without removing a full link. Mesh bracelets use a different arrangement: on designs with a sliding clasp, the clasp moves along the continuous band and locks at a chosen point. Follow the clasp’s release and locking design. If it doesn’t move smoothly or lock securely, don’t force it.
Make one small change, close the clasp, then reassess. A micro-adjustment won’t compensate for a bracelet that is substantially too long, but it may avoid removing another link when the fit is already close. If the clasp has no adjustment positions, leave it as designed and assess whether the bracelet length needs changing.
How to check the bracelet after adjustment
Fasten the clasp fully before judging the fit. Check that it closes securely and the bracelet sits evenly, without a twisted link or a gap at the join. A clasp that looks closed but opens under light handling isn’t ready to wear.
- Check the feel at rest. The bracelet should feel secure without pinching or pressing uncomfortably into your wrist. Avoid relying on a universal finger-width rule: link size, clasp shape and wrist movement differ.
- Move naturally. Bend your wrist and rotate your forearm as you normally would. Notice whether the watch shifts excessively, digs in or restricts movement.
- Recheck the position. The watch should sit comfortably on top of your wrist rather than repeatedly rolling to one side. If the clasp pulls off-centre, review how the adjustment is distributed across the bracelet.
- Change only one thing at a time. If it still feels wrong, make a single small clasp change or reconsider the link length, then repeat the check. Don’t remove several links at once.
Wear the watch briefly at home and reassess before wearing it for the day. Comfort can change as you move, so a quick check at rest isn’t enough. If adjustment leaves the clasp loose, the links uneven or the fit uncomfortable, stop and return to the last secure position.
For comparison, designer watches come in a range of styles.
What to Do After Adjusting a Metal Watch Bracelet
Finish by checking the connection, keeping the removed parts safe and confirming the fit before wearing the watch. A bracelet that looks joined may still have a loose pin or screw, and a clasp that hasn’t engaged properly can open unexpectedly. Inspect it rather than treating the adjustment as complete as soon as the links are back together.
Keep removed links and check the final connection
Place removed links and their matching pins, screws or collars in a labelled container. Keep the parts together and note which bracelet they came from. This makes a future length change easier, provided the original fittings are retained and undamaged.
Before putting the watch on, look along the rejoined section. Check that the links sit evenly, the pin or screw is in place and no gap has opened at the joint. Close the clasp fully, then give the bracelet a gentle hand check. If a connection shifts, a component protrudes or the clasp won’t stay shut, don’t wear the watch until the issue is resolved.
When the bracelet still does not fit
If the bracelet remains too short, it may need additional links that match its specific design and fittings. Don’t force a link from another bracelet into place or substitute an improvised pin or screw. A part that appears close in size may not secure correctly, putting the connection at risk.
Stop if you’re uncertain about the bracelet construction, a component is unusually resistant, a fitting is damaged or the clasp remains insecure. Don’t continue by applying more pressure or wearing the watch to see whether it holds. Keep the parts safely stored and don’t wear the watch until it can be reassembled securely.
Use this final checklist before wearing it:
- Connection: Rejoined links sit flush, with no visible gap or loose movement.
- Clasp: It closes fully and remains securely fastened during a gentle check.
- Fit: The bracelet feels comfortable as you move your wrist, without pinching or shifting excessively.
- Spare parts: Removed links and their pins, screws or collars are together in a labelled container.
- Stop point: Don’t wear the watch if the fitting is unclear, damaged, resistant or insecure.
A careful final check completes the adjustment without sacrificing parts you may need later. The designer watch selection offers another place to explore different styles.
Make Your Next Watch Choice with Confidence
A comfortable fit can change how naturally a watch becomes part of your day. Keep the spare links safe and note the clasp position that feels right. When adjusting another bracelet, use its construction as your guide rather than assuming the same method applies. Knowing how to adjust a metal watch bracelet is useful, but patience matters just as much. Stop if a fitting resists or the clasp won’t secure properly.
If you’re considering a watch to suit your style, explore the watch collection. Shop with 100% Authentic watches, Free UK Delivery, Best Price Promise and Easy Returns.
Take your time with the fit, then enjoy wearing a watch that feels right for you.
Frequently Asked Questions
Can I adjust a metal watch bracelet at home?
Yes, you can adjust a metal watch bracelet at home if you can identify its construction and have a suitable tool. Compare the links and clasp, then consult the manufacturer’s instructions if available. Work slowly and keep the watch stable. If you’re learning how to adjust a metal watch bracelet, stop if the fitting is unclear, a component resists or the clasp won’t stay closed after adjustment.
Do all metal watch bracelets use the same link-removal method?
No, the method depends on the bracelet. A linked design may use push pins, screws or another fitting, whilst some mesh bracelets adjust at the clasp. Using a screwdriver on a pin-secured link won’t release it correctly and may damage the fitting. Identify the connection first, and follow instructions for that construction rather than assuming a method that worked on another watch will apply.
How many links should I remove from a metal watch bracelet?
There’s no fixed number, because wrist size, link dimensions and the watch’s starting fit all matter. Begin with the smallest change likely to help, then try the bracelet on again. If the clasp ends up noticeably to one side of your wrist, the adjustment may need to be balanced across both sides. Keep removed parts so you can reverse the change if the watch feels too tight.
Can I make a metal watch bracelet bigger after removing links?
Often, yes, if you kept the removed links and their original fittings. Refit only parts designed for that bracelet, and check that each connection sits securely before wearing the watch. Some clasps also provide a limited amount of extra adjustment, depending on the design. Don’t use a similar-looking link from another bracelet or substitute a different pin or screw, as it may not hold correctly.
What does the arrow on the underside of a watch bracelet mean?
Where an arrow is present, it shows the direction in which a link pin should be pushed out. It’s a guide for pin removal, not proof that every link uses the same fitting. Check the direction on the specific link you plan to remove. If there’s no arrow, don’t guess based on another section of the bracelet; identify the fitting and check the instructions before applying pressure.
Can I shorten a metal watch bracelet with household tools?
It’s better to use a purpose-made tool suited to the fitting. Household items such as knives or oversized screwdrivers can slip, mark the metal or damage a small component. A correctly fitting tool gives you better control and makes it easier to keep pressure aligned. If you can’t identify the connection or it won’t move with light, controlled pressure, stop rather than trying a stronger improvised tool.
Will adjusting a metal watch bracelet affect the watch’s warranty?
That depends on the manufacturer’s warranty terms and the conditions supplied with your watch. Don’t assume that bracelet adjustment is either covered or excluded, as policies can differ. Read the documentation before making a change if warranty coverage matters to you. Keep any paperwork with the watch, and avoid altering the case or movement as part of a bracelet adjustment, since those are separate components.